NestJS는 Node.js 백엔드 프레임워크 중 가장 체계적인 구조를 제공한다. Express가 자유롭지만 프로젝트가 커질수록 혼란스러워지는 반면, NestJS는 Angular에서 가져온 모듈/컨트롤러/서비스 패턴으로 팀 규모가 커져도 코드베이스를 유지보수하기 쉽게 설계되어 있다. Express는 미니멀리스트 프레임워크다. 라우터, 미들웨어, 요청/응답 처리가 전부이며 나머지는 개발자가 알아서 구성해야 한다.
NestJS는 Node.js 백엔드 프레임워크 중 가장 체계적인 구조를 제공한다. Express가 자유롭지만 프로젝트가 커질수록 혼란스러워지는 반면, NestJS는 Angular에서 가져온 모듈/컨트롤러/서비스 패턴으로 팀 규모가 커져도 코드베이스를 유지보수하기 쉽게 설계되어 있다. 이 튜토리얼에서는 프로젝트 초기화부터 TypeORM 데이터베이스 연결, JWT 인증, Swagger 문서 자동화까지 실제 API 서버를 처음부터 구축하는 과정을 단계별로 다룬다.
NestJS의 모듈·컨트롤러·서비스 계층 구조
NestJS를 선택하는 이유 — Express와 무엇이 다른가
Express는 미니멀리스트 프레임워크다. 라우터, 미들웨어, 요청/응답 처리가 전부이며 나머지는 개발자가 알아서 구성해야 한다. 소규모 프로젝트에서는 이 자유도가 장점이지만, 팀원이 늘거나 코드베이스가 수만 줄을 넘어가면 구조적 혼란이 시작된다.
NestJS는 이 문제를 의존성 주입(Dependency Injection)과 명확한 레이어 분리로 해결한다. 각 기능은 독립적인 모듈로 캡슐화되며, 모듈 간 의존관계는 NestJS IoC 컨테이너가 관리한다. TypeScript를 일급 지원하며, 데코레이터 기반 API 덕분에 코드가 선언적이고 읽기 쉽다.
구조적 일관성: 신규 팀원이 어디에 무엇을 작성해야 하는지 명확
내장 DI 컨테이너: 서비스 간 의존관계를 수동으로 연결할 필요 없음
플랫폼 독립성: Express 또는 Fastify 중 선택 가능
풍부한 생태계: TypeORM, Prisma, Passport, Swagger 공식 통합 모듈 제공
프로젝트 초기 설정
NestJS CLI를 전역 설치하면 프로젝트 스캐폴딩, 모듈/서비스/컨트롤러 파일 생성을 자동화할 수 있다. Node.js 20+ 환경에서 아래 명령을 실행한다.
NestJS CLI 설치 및 프로젝트 생성
# NestJS CLI 전역 설치
npm install -g @nestjs/cli
# 새 프로젝트 생성 (패키지 매니저 선택: npm)
nest new my-api
cd my-api
# 생성된 폴더 구조
my-api/
├── src/
│ ├── app.controller.ts # 루트 컨트롤러
│ ├── app.controller.spec.ts
│ ├── app.module.ts # 루트 모듈
│ ├── app.service.ts # 루트 서비스
│ └── main.ts # 엔트리포인트
├── test/
├── nest-cli.json
├── package.json
└── tsconfig.json
# 개발 서버 실행 (파일 변경 감지 포함)
npm run start:dev
main.ts에서 NestFactory로 앱을 부트스트랩한다. 기본 포트는 3000이며 app.listen()이 HTTP 서버를 시작한다. 이 파일에서 전역 미들웨어, ValidationPipe, CORS 설정을 등록하게 된다.
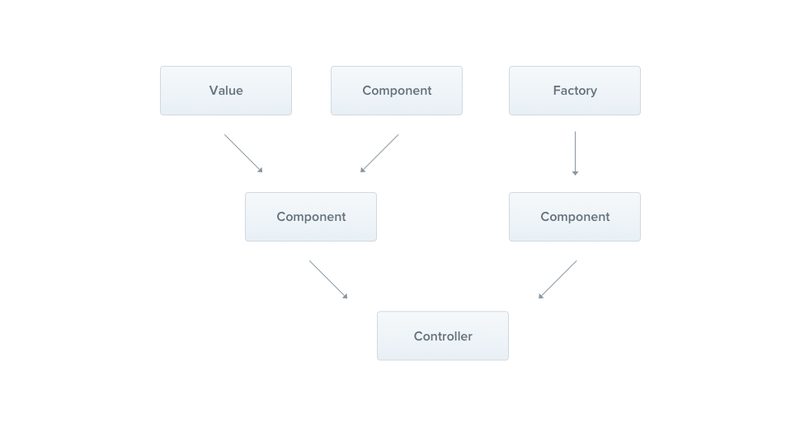
모듈·컨트롤러·서비스 — 핵심 3요소
NestJS 아키텍처의 핵심은 세 가지 빌딩 블록이다.
Module: 관련 기능을 하나의 단위로 묶는 컨테이너. 컨트롤러와 서비스를 선언하고, 다른 모듈과의 의존관계를 명시한다.
Controller: HTTP 요청을 받아 응답을 반환하는 레이어. 비즈니스 로직을 직접 처리하지 않고 서비스에 위임한다.
Service: 실제 비즈니스 로직이 위치하는 곳. 데이터베이스 조회, 계산, 외부 API 호출 등을 담당한다.
NestJS는 @nestjs/typeorm 패키지로 TypeORM을 공식 지원한다. TypeORM은 Active Record와 Data Mapper 두 패턴을 모두 지원하는데, NestJS 프로젝트에서는 서비스 계층과 잘 맞는 Data Mapper 패턴(Repository 방식)을 주로 사용한다.
# src/users/users.module.ts — 엔티티 등록
import { Module } from '@nestjs/common';
import { TypeOrmModule } from '@nestjs/typeorm';
import { UsersService } from './users.service';
import { UsersController } from './users.controller';
import { User } from './user.entity';
@Module({
imports: [TypeOrmModule.forFeature([User])],
controllers: [UsersController],
providers: [UsersService],
exports: [UsersService],
})
export class UsersModule {}
# src/users/users.service.ts — Repository 사용
import { Injectable, NotFoundException } from '@nestjs/common';
import { InjectRepository } from '@nestjs/typeorm';
import { Repository } from 'typeorm';
import { User } from './user.entity';
import { CreateUserDto } from './dto/create-user.dto';
import * as bcrypt from 'bcrypt';
@Injectable()
export class UsersService {
constructor(
@InjectRepository(User)
private usersRepository: Repository<User>,
) {}
async create(dto: CreateUserDto): Promise<User> {
const hashed = await bcrypt.hash(dto.password, 10);
const user = this.usersRepository.create({ ...dto, password: hashed });
return this.usersRepository.save(user);
}
async findByEmail(email: string): Promise<User | null> {
return this.usersRepository
.createQueryBuilder('user')
.addSelect('user.password')
.where('user.email = :email', { email })
.getOne();
}
async findOne(id: number): Promise<User> {
const user = await this.usersRepository.findOneBy({ id });
if (!user) throw new NotFoundException('User not found');
return user;
}
}
synchronize: true는 개발 환경에서만 TypeORM의 synchronize: true는 앱 시작 시 엔티티 구조에 맞게 테이블을 자동으로 변경한다. 편리하지만 프로덕션에서는 데이터 손실 위험이 있다. 운영 환경에서는 반드시 false로 설정하고 마이그레이션 파일을 별도 관리해야 한다.
JWT 인증 모듈 구현
NestJS에서 인증은 Passport 전략(Strategy)으로 구현한다. @nestjs/passport와 passport-jwt를 조합하면 JWT 검증 로직을 Guard로 추상화할 수 있다. 로그인 엔드포인트에서 토큰을 발급하고, 보호된 라우트에 @UseGuards(JwtAuthGuard)를 붙이는 방식이다.
Auth 모듈 — JWT 전략 및 가드 구현
# 패키지 설치
npm install @nestjs/passport @nestjs/jwt passport passport-jwt bcrypt
npm install -D @types/passport-jwt @types/bcrypt
# src/auth/jwt.strategy.ts
import { Injectable } from '@nestjs/common';
import { PassportStrategy } from '@nestjs/passport';
import { ExtractJwt, Strategy } from 'passport-jwt';
import { ConfigService } from '@nestjs/config';
@Injectable()
export class JwtStrategy extends PassportStrategy(Strategy) {
constructor(config: ConfigService) {
super({
jwtFromRequest: ExtractJwt.fromAuthHeaderAsBearerToken(),
ignoreExpiration: false,
secretOrKey: config.get<string>('JWT_SECRET'),
});
}
async validate(payload: { sub: number; email: string }) {
return { userId: payload.sub, email: payload.email };
}
}
# src/auth/jwt-auth.guard.ts
import { Injectable } from '@nestjs/common';
import { AuthGuard } from '@nestjs/passport';
@Injectable()
export class JwtAuthGuard extends AuthGuard('jwt') {}
# src/auth/auth.service.ts
import { Injectable, UnauthorizedException } from '@nestjs/common';
import { JwtService } from '@nestjs/jwt';
import { UsersService } from '../users/users.service';
import * as bcrypt from 'bcrypt';
@Injectable()
export class AuthService {
constructor(
private usersService: UsersService,
private jwtService: JwtService,
) {}
async login(email: string, password: string) {
const user = await this.usersService.findByEmail(email);
if (!user || !(await bcrypt.compare(password, user.password))) {
throw new UnauthorizedException('이메일 또는 비밀번호가 올바르지 않습니다');
}
const payload = { sub: user.id, email: user.email };
return {
accessToken: this.jwtService.sign(payload),
};
}
}
# src/auth/auth.module.ts
import { Module } from '@nestjs/common';
import { JwtModule } from '@nestjs/jwt';
import { PassportModule } from '@nestjs/passport';
import { ConfigModule, ConfigService } from '@nestjs/config';
import { AuthService } from './auth.service';
import { AuthController } from './auth.controller';
import { JwtStrategy } from './jwt.strategy';
import { UsersModule } from '../users/users.module';
@Module({
imports: [
UsersModule,
PassportModule,
JwtModule.registerAsync({
imports: [ConfigModule],
inject: [ConfigService],
useFactory: (config: ConfigService) => ({
secret: config.get('JWT_SECRET'),
signOptions: { expiresIn: '1d' },
}),
}),
],
providers: [AuthService, JwtStrategy],
controllers: [AuthController],
})
export class AuthModule {}
# 보호된 라우트에 가드 적용 예시
import { UseGuards, Get, Request } from '@nestjs/common';
import { JwtAuthGuard } from '../auth/jwt-auth.guard';
@UseGuards(JwtAuthGuard)
@Get('profile')
getProfile(@Request() req) {
return req.user; // JwtStrategy.validate()가 반환한 객체
}
Swagger API 문서 자동화
NestJS의 @nestjs/swagger는 데코레이터를 분석해 OpenAPI 스펙을 자동으로 생성한다. 컨트롤러와 DTO에 데코레이터 몇 줄을 추가하면 /api 경로에 Swagger UI가 열린다. 별도 YAML 파일을 작성할 필요 없이 코드에서 문서가 관리된다.
Swagger 설정 및 DTO 데코레이터
# 패키지 설치
npm install @nestjs/swagger
# src/main.ts — Swagger 등록
import { NestFactory } from '@nestjs/core';
import { SwaggerModule, DocumentBuilder } from '@nestjs/swagger';
import { ValidationPipe } from '@nestjs/common';
import { AppModule } from './app.module';
async function bootstrap() {
const app = await NestFactory.create(AppModule);
// 전역 ValidationPipe 등록
app.useGlobalPipes(new ValidationPipe({ whitelist: true, transform: true }));
// Swagger 설정
const config = new DocumentBuilder()
.setTitle('My API')
.setDescription('NestJS REST API 문서')
.setVersion('1.0')
.addBearerAuth()
.build();
const document = SwaggerModule.createDocument(app, config);
SwaggerModule.setup('api', app, document);
await app.listen(3000);
console.log('Swagger UI: http://localhost:3000/api');
}
bootstrap();
# src/users/dto/create-user.dto.ts
import { ApiProperty } from '@nestjs/swagger';
import { IsEmail, IsString, MinLength } from 'class-validator';
export class CreateUserDto {
@ApiProperty({ example: 'dev@example.com', description: '사용자 이메일' })
@IsEmail()
email: string;
@ApiProperty({ example: '홍길동', description: '사용자 이름' })
@IsString()
name: string;
@ApiProperty({ example: 'securepass123', description: '비밀번호 (최소 8자)' })
@IsString()
@MinLength(8)
password: string;
}
# 컨트롤러에 Swagger 데코레이터 추가
import { ApiTags, ApiOperation, ApiBearerAuth } from '@nestjs/swagger';
@ApiTags('users') // Swagger UI에서 그룹화
@Controller('users')
export class UsersController {
@ApiOperation({ summary: '회원 생성' })
@Post()
create(@Body() dto: CreateUserDto) { ... }
@ApiBearerAuth() // JWT 필요 표시
@UseGuards(JwtAuthGuard)
@Get()
findAll() { ... }
}
localhost:3000/api에서 열리는 자동 생성 Swagger 문서
환경변수 관리 — ConfigModule
@nestjs/config는 dotenv를 래핑해 NestJS DI 시스템과 통합한다. ConfigModule.forRoot({ isGlobal: true })로 한 번만 등록하면 모든 모듈에서 ConfigService를 주입받아 환경변수를 타입 안전하게 사용할 수 있다.
NestJS의 ValidationPipe는 class-validator와 class-transformer를 활용해 요청 DTO를 자동으로 검증한다. whitelist: true를 설정하면 DTO에 정의되지 않은 필드는 자동으로 제거되어 불필요한 데이터가 서비스로 넘어가지 않는다.
예외 처리는 NestJS 내장 HttpException 클래스 또는 NotFoundException, BadRequestException 같은 서브클래스를 사용한다. 전역 예외 필터를 등록하면 모든 에러 응답을 일관된 형식으로 반환할 수 있다.
DTO 검증 및 커스텀 에러 응답 필터
# 패키지 설치
npm install class-validator class-transformer
# src/common/filters/http-exception.filter.ts
import {
ExceptionFilter, Catch, ArgumentsHost,
HttpException, HttpStatus
} from '@nestjs/common';
import { Request, Response } from 'express';
@Catch(HttpException)
export class HttpExceptionFilter implements ExceptionFilter {
catch(exception: HttpException, host: ArgumentsHost) {
const ctx = host.switchToHttp();
const response = ctx.getResponse<Response>();
const request = ctx.getRequest<Request>();
const status = exception.getStatus();
const exceptionResponse = exception.getResponse();
response.status(status).json({
statusCode: status,
timestamp: new Date().toISOString(),
path: request.url,
message:
typeof exceptionResponse === 'object'
? (exceptionResponse as any).message
: exceptionResponse,
});
}
}
# src/main.ts — 전역 필터 및 파이프 등록
app.useGlobalFilters(new HttpExceptionFilter());
app.useGlobalPipes(
new ValidationPipe({
whitelist: true, // DTO 외 필드 제거
forbidNonWhitelisted: true, // 미허용 필드 있으면 400 반환
transform: true, // 타입 자동 변환 (string '1' → number 1)
transformOptions: { enableImplicitConversion: true },
}),
);
# 서비스에서 예외 던지기
import { NotFoundException, ConflictException } from '@nestjs/common';
async findOne(id: number): Promise<User> {
const user = await this.usersRepository.findOneBy({ id });
if (!user) {
throw new NotFoundException(`ID ${id}에 해당하는 사용자가 없습니다`);
}
return user;
}
async create(dto: CreateUserDto): Promise<User> {
const exists = await this.usersRepository.findOneBy({ email: dto.email });
if (exists) {
throw new ConflictException('이미 사용 중인 이메일입니다');
}
// ...
}