개발 환경 세팅에서 가장 먼저 해야 할 일은 macOS 기본값을 개발자에게 맞게 조정하는 것이다. 기본 설정 그대로 쓰면 숨김 파일이 보이지 않고, 키 반복 속도가 느리며, 소프트웨어 업데이트 때마다 개발 도구가 재설치되기도 한다.
개발자 맥북 초기 셋업 체크리스트 2026 — Homebrew·dotfiles·CLI 도구·VS Code 완전 정리
맥북을 새로 받았을 때 개발 환경 초기화를 한 번에 끝내지 못하면 반나절을 낭비한다. 이 체크리스트는 M 시리즈 맥북 기준 2026년 현재 실무에서 검증된 항목만 담았다. 개발 환경 세팅에서 가장 먼저 해야 할 일은 macOS 기본값을 개발자에게 맞게 조정하는 것이다. 기본 설정 그대로 쓰면 숨김 파일이 보이지 않고, 키 반복 속도가 느리며, 소프트웨어 업데이트 때마다 개발 도구가 재설치되기도 한다.
by Lee
맥북을 새로 받았을 때 개발 환경 초기화를 한 번에 끝내지 못하면 반나절을 낭비한다. 이 체크리스트는 M 시리즈 맥북 기준 2026년 현재 실무에서 검증된 항목만 담았다. "이것도 설치하면 좋다"가 아니라 "없으면 개발이 불편한 것"만 골랐다. 각 도구 선택의 이유도 함께 적었다.
이 글이 필요한 사람: 새 맥북을 받은 백엔드·풀스택 개발자, 맥 개발 환경을 처음 세팅하는 개발자, 기존 환경을 dotfiles로 재현 가능하게 만들고 싶은 엔지니어.
※ macOS 15.x (Sequoia), M-series 칩 기준. 2026년 4월 검증.
1단계: 시스템 기반 — OS 설정과 Homebrew
macOS 개발자 기본 설정# Finder에서 숨김 파일 표시
defaults write com.apple.finder AppleShowAllFiles YES

# 키 반복 속도 최대화 (재시작 필요)
defaults write NSGlobalDomain KeyRepeat -int 1
defaults write NSGlobalDomain InitialKeyRepeat -int 10

# Dock 자동 숨기기
defaults write com.apple.dock autohide -bool true
killall Dock

# 스크린샷 저장 위치 변경 (Desktop → ~/Screenshots)
mkdir -p ~/Screenshots
defaults write com.apple.screencapture location ~/Screenshots
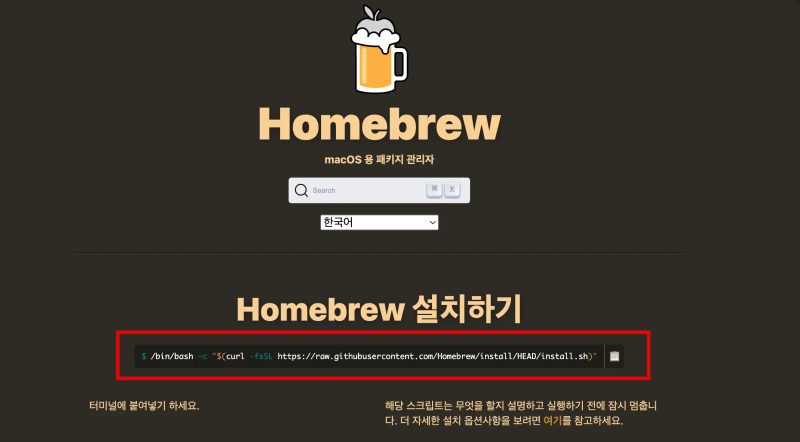
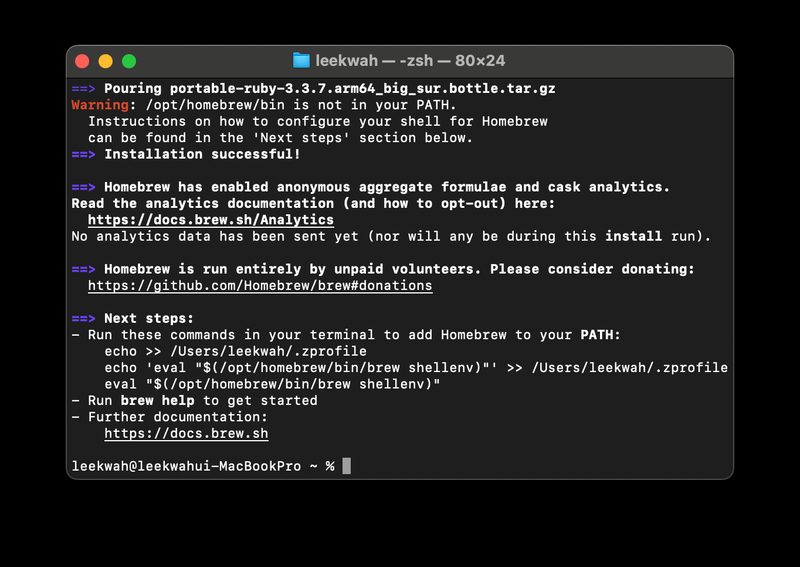
Homebrew는 macOS 패키지 매니저다. 공식 사이트에서 스크립트 한 줄로 설치된다. M-series 맥에서는 /opt/homebrew에 설치된다(Intel 맥은 /usr/local).
Homebrew 설치/bin/bash -c "$(curl -fsSL https://raw.githubusercontent.com/Homebrew/install/HEAD/install.sh)"

# M-series 맥에서 PATH 추가 (설치 후 안내 메시지 따라하기)
echo 'eval "$(/opt/homebrew/bin/brew shellenv)"' >> ~/.zprofile
eval "$(/opt/homebrew/bin/brew shellenv)"

# 설치 확인
brew --version
2단계: 셸 환경 — Zsh + Oh My Zsh + Starship
macOS 기본 셸은 zsh다. 기본 zsh에 플러그인과 프롬프트 테마를 더하면 자동완성, 명령어 하이라이팅, Git 상태 표시가 가능해진다. Oh My Zsh는 zsh 플러그인 관리의 표준이고, Starship은 빠르고 예쁜 프롬프트 프레임워크다.
Oh My Zsh + Starship 설치# Oh My Zsh 설치
sh -c "$(curl -fsSL https://raw.githubusercontent.com/ohmyzsh/ohmyzsh/master/tools/install.sh)"

# 유용한 플러그인 설치
git clone https://github.com/zsh-users/zsh-autosuggestions ${ZSH_CUSTOM:-~/.oh-my-zsh/custom}/plugins/zsh-autosuggestions
git clone https://github.com/zsh-users/zsh-syntax-highlighting ${ZSH_CUSTOM:-~/.oh-my-zsh/custom}/plugins/zsh-syntax-highlighting

# ~/.zshrc 플러그인 활성화
# plugins=(git zsh-autosuggestions zsh-syntax-highlighting)

# Starship 설치 (프롬프트)
brew install starship
echo 'eval "$(starship init zsh)"' >> ~/.zshrc
3단계: 언어 버전 관리 — mise (nvm·pyenv 대체)
프로젝트마다 Node.js 버전이나 Python 버전이 다른 경우가 많다. 2024년 이후 개발자 커뮤니티에서는 nvm·pyenv·rbenv를 하나로 통합한 mise(구 rtx)로 이동하는 추세다. Rust로 만들어져 nvm보다 10배 이상 빠르고, 단일 도구로 Node·Python·Ruby·Go 등 모든 런타임을 관리한다.
mise 설치 및 기본 사용# mise 설치
brew install mise

# 셸 통합 (~/.zshrc에 추가)
echo 'eval "$(mise activate zsh)"' >> ~/.zshrc
source ~/.zshrc

# Node.js LTS 설치
mise install node@lts
mise use -g node@lts

# Python 설치
mise install python@3.12
mise use -g python@3.12

# 특정 프로젝트에서 버전 고정
cd my-project
mise use node@20.11.0  # .mise.toml 파일 자동 생성

# 설치된 버전 확인
mise list
nvm에서 mise로 전환 시 주의:
~/.nvm에 설치된 패키지들은 자동 이전되지 않는다. mise로 새로 설치 후 전역 npm 패키지(npm list -g --depth=0)를 확인하고 필요한 것만 재설치한다.4단계: 필수 CLI 도구 — 개발 속도를 높이는 것만
터미널 작업 시간을 줄여주는 CLI 도구들이 있다. "있으면 좋은 것"이 아니라 실무에서 매일 쓰는 것만 골랐다.
필수 CLI 도구 일괄 설치brew install \
  git \          # 최신 git (macOS 기본보다 최신 버전)
  gh \           # GitHub CLI — PR, issue, 인증 관리
  fzf \          # 퍼지 검색 — Ctrl+R 히스토리 검색이 극적으로 개선됨
  bat \          # cat 대체 — 문법 하이라이팅, 줄번호
  eza \          # ls 대체 — 색상, 아이콘, Git 상태 표시
  ripgrep \      # grep 대체 — 엄청나게 빠름
  fd \           # find 대체 — 직관적인 문법
  jq \           # JSON 처리 — API 응답 파싱에 필수
  httpie \       # curl 대체 — 사람이 읽기 좋은 HTTP 클라이언트
  tldr           # man 대체 — 실용적인 예제 중심 도움말
~/.zshrc alias 추가# ~/.zshrc에 추가
alias ls='eza --icons'
alias ll='eza -la --icons --git'
alias cat='bat'
alias grep='rg'
alias find='fd'

# fzf 통합 (설치 후 자동 설정 스크립트 실행)
$(brew --prefix)/opt/fzf/install
5단계: VS Code 세팅 — 확장·설정·동기화
VS Code는 Homebrew Cask로 설치하면 업데이트가 자동화된다. 설치 후 Settings Sync를 켜두면 새 맥으로 이동할 때 설정·확장·키바인딩이 자동으로 복원된다.
VS Code 설치 + code 명령어 등록# VS Code 설치
brew install --cask visual-studio-code

# 'code' 명령어 (VS Code Command Palette에서 실행)
# CMD + Shift + P → "Shell Command: Install 'code' command in PATH"

# 자주 쓰는 확장 CLI 설치
code --install-extension esbenp.prettier-vscode
code --install-extension ms-python.python
code --install-extension dbaeumer.vscode-eslint
code --install-extension eamodio.gitlens
code --install-extension bradlc.vscode-tailwindcss
code --install-extension GitHub.copilot
settings.json 핵심 설정{
  "editor.fontFamily": "JetBrains Mono, Menlo, monospace",
  "editor.fontSize": 14,
  "editor.lineHeight": 1.6,
  "editor.tabSize": 2,
  "editor.formatOnSave": true,
  "editor.defaultFormatter": "esbenp.prettier-vscode",
  "editor.bracketPairColorization.enabled": true,
  "terminal.integrated.defaultProfile.osx": "zsh",
  "files.trimTrailingWhitespace": true,
  "git.autofetch": true
}
6단계: Git 설정 — 전역 설정과 SSH 키
Git 초기 설정을 빠뜨리면 커밋 author가 잘못 기록되거나 HTTPS 인증이 매번 물어보는 상황이 발생한다. SSH 키 설정까지 마치면 모든 Git 작업에서 비밀번호 입력이 사라진다.
Git 전역 설정 + SSH 키 생성# Git 전역 사용자 설정
git config --global user.name "Your Name"
git config --global user.email "you@example.com"
git config --global core.editor "code --wait"
git config --global init.defaultBranch main
git config --global pull.rebase false

# SSH 키 생성 (ED25519 권장)
ssh-keygen -t ed25519 -C "you@example.com"

# SSH agent에 키 추가
eval "$(ssh-agent -s)"
ssh-add --apple-use-keychain ~/.ssh/id_ed25519

# 공개 키를 클립보드에 복사 → GitHub Settings에 붙여넣기
pbcopy < ~/.ssh/id_ed25519.pub

# GitHub 연결 테스트
ssh -T git@github.com
7단계: dotfiles 관리 — 30분 안에 환경 재현
dotfiles는 ~/.zshrc, ~/.gitconfig, VS Code settings.json 등 설정 파일들이다. 이걸 GitHub 저장소로 관리하면 새 맥에서 git clone + ./install.sh 한 번으로 동일한 환경을 재현할 수 있다.
가장 간단한 방법은 stow를 쓰는 심볼릭 링크 방식이다.
GNU Stow로 dotfiles 관리# stow 설치
brew install stow

# dotfiles 저장소 구조 예시
# ~/dotfiles/
#   zsh/.zshrc
#   git/.gitconfig
#   starship/.config/starship.toml

# 심볼릭 링크 생성 (~/dotfiles에서 실행)
cd ~/dotfiles
stow zsh    # ~/.zshrc → ~/dotfiles/zsh/.zshrc 링크 생성
stow git    # ~/.gitconfig → ~/dotfiles/git/.gitconfig 링크 생성

# GitHub에 올리기
git init && git add . && git commit -m "init dotfiles"
git remote add origin git@github.com:username/dotfiles.git
git push -u origin main
빠른 재설치 — Brewfile로 한 번에
Homebrew로 설치한 모든 패키지 목록을 Brewfile로 저장해두면 새 맥에서 brew bundle 한 번으로 동일한 패키지를 모두 설치할 수 있다.
Brewfile 생성 및 재설치# 현재 설치된 모든 패키지를 Brewfile로 저장
brew bundle dump --file ~/dotfiles/Brewfile

# Brewfile 예시 내용
# brew "git"
# brew "gh"
# brew "fzf"
# brew "ripgrep"
# cask "visual-studio-code"
# cask "iterm2"

# 새 맥에서 Brewfile로 일괄 설치
brew bundle install --file ~/dotfiles/Brewfile
M-series 맥 주의사항: Rosetta 2가 필요한 일부 패키지는
arch -x86_64 brew install [패키지명]으로 설치해야 한다. brew doctor를 주기적으로 실행해 환경 이상을 미리 잡아두는 습관이 중요하다.맥북 셋업HomebrewdotfilesfnmpyenvuvzshiTerm2VS Code개발 환경
함께 보면 좋은 문제 해결
EXPLORE / 개발자 작업환경
이어서 읽어보기

개발자 작업환경개발자 원격근무 셋업 체크리스트 2026 — 네트워크·보안·개발 환경·생산성 40개 항목 완전 점검2026-04-19
개발자 작업환경WSL2로 Windows를 개발 메인 환경으로 쓴 1년 — macOS를 포기한 백엔드 개발자의 실제 기록2026-04-20

개발자 작업환경개발자 스탠딩 데스크 추천 2026 — FlexiSpot·Uplift·IKEA·데스커 비교 & 구매 체크리스트2026-04-22
개발자 작업환경맥 미니 M4 vs 맥 스튜디오 M4 — 2026 개발자 데스크톱 선택 가이드2026-04-22